Friday, April 21, 2017

Bridal Makeup Tips !


Brides are my favorite to work with !
Every bride has their own, unique style. Creating a look to compliment her overall look, and style is what makes the bride feel her absolute best on her special day.

Makeup is one of the most important components on your wedding day. Natural, Dramatic or Sultry/Sexy, you must find a makeup artist that will execute effectively. When choosing an artist, pay attention to these things; Artistry, Professionalism, Time Management and Pricing.

Booking your makeup artist ahead of time will be very beneficial for you. Go online and search for local artists, and check out their portfolio. Gather some options, choose about 4 artists that you like and begin your inquiries. Be mindful to have all your information ready when inquiring for services.


~ Do you have a budget ?

~ Are you prepared to pay a deposit ?
~ Do you have a bridal party that will need services ?
~ Do you require touch up services ?
~ Does this artist travel ?

Next is to schedule a trial. A trial is an option given to make the artist, and client more comfortable. You will engage in conversation about the overall look, color selection, pricing, etc. You will also discuss timing for the big day. Time is something a lot people don't take into account when planning. When assisting brides, I always allow myself a good amount of time to work. You have to consider time for prep, dressing, food/drinks and those unexpected moments we didn't plan.


Lets get into pricing ! 
When receiving an estimate for your special day, you have to consider the makeup application, lash application, travel and touch ups. Believe it or not, Bridal Makeup isn't your typical application. As an artist, It is my responsibility to make sure your makeup stays flawless all day. From the complexion to the lips, you must look amazing at every angle.

When discussing pricing with your MUA, ask plenty of questions !. Make sure the artist formulates a contract. The contract solidifies what you expect of the artist, and what the artist expects of you. I look at the contract as security for both parties.


On your Wedding Day, you want to feel and look your most beautiful.
Find an artist that you trust and will treat you like the Queen you are !

I hope this article was informative and helpful for my future brides !


Wednesday, February 15, 2017

Journey of a Self Taught Makeup Artist..


Ira A. Evans
@ira.anthonymua

I've been a self taught, freelance makeup artist for a little over 6 years now. I've learned the basics of makeup by reading, watching others and practice. Being self-taught also means that I don't have any licenses or certifications to apply makeup. Now, I know there's a lot of controversy when it comes to being a "certified" makeup artist. I come to let you know that you DO NOT need to be licensed to be a makeup artist. If you would like to work in a salon or for a company that does brows/lashes etc, you will need to be licensed in most cases.

When starting out as a MUA, its about Practice ! Practice ! Practice !
You must study to show thyself approved. I would always use YouTube as a tool to catch up on the latest trends, new techniques and products. Makeup books are also a good tool as well. One of my favorites are FACE to FACE by Scott Barnes.


After working for myself for a few years, I decided to apply to cosmetic companies to gain more experience. It took me no time to find a job. I wasn't even qualified fully for the position, I knew that was nothing by God. I worked as a Prestige Consultant at ULTA Beauty for 2 years. This position exposed me to numerous brands and increased my confidence. I worked with many different types of women and nationalities. I also gained many business relationships with the vendors that came into the store.


After my time ended at ULTA Beauty, I was blessed the opportunity to work with the brand Lancome Cosmetics. I worked as a Freelance MUA. I loved this position because I was able to travel to different stores, meet new people and on top of that this brand was major ! Even though I loved my job, there were some things about retail that i hated. Everything was always about SALES, SALES, SALES. I cared more about the artistry.
I cared more about helping people and catering to their needs. I've also
experienced a lot of jealousy. Being the only African American male on the team,
I would always get that side eye. I would really experience it at  the celebrity artist events.
After experiencing discrimination for higher authority, I decided to leave Lancome.  


From that point on, I focused on myself and my brand. Now don't get me wrong, I was doing
my own thing outside of my other jobs. It was just time for me to be the boss ! Working for someone
else just wasn't for me anymore. I needed more flexibility.

I started taking more clients, doing more shoots and marketing myself. Social Media has been a huge outlet for my business. Make sure you post all your work. Make sure everything you post is appealing and represents your brand in a positive and innovative light.


 I asked God to bless me with more bridal clients. I had a huge increase in bridal clients within the last  2 years. Working for myself, full time has been an amazing but also challenging experience. There are times when you want to give up. You will have a season where it will be slow, and times when people will try and prostitute your gift. DON'T GIVE UP ! You don't have to be nasty or become a mean person, just pray and put your business hat on. You have to treat your business as your child, your prized possession. You have to think, what would I like my business to look like in 5+ years ?. Keep a positive mind set and keep moving forward.


I am learning new things every single day. I feel like if you're not taking time to study your craft, you're not making room for advancement.  My goal is to enhance, inspire and educate. Being a Makeup Artist isn't always about putting makeup on someone. Working with woman, beauty is very personal and its a vulnerable moment. When hired for a job, they are putting a trust in you. I've always tried to build a relationship with my client. You want to make the client feel welcome and comfortable. This will not only build a trust, this have them continuing to book you for future engagements. Referrals are also a huge part of my clientele. When a woman loves her makeup she will tell all her girlfriends. And you know what happens after that !

In conclusion, I just want all my aspiring MUA's to know that things will get better. You have to start somewhere and the only way to go is UP from here ! ENHANCE, INSPIRE  & EDUCATE.


Tuesday, January 10, 2017

BEST Low End Makeup Brushes !


I'm sure we've been waiting for this one...
LOW END MAKEUP BRUSHES ! In this post I will be talking about my favorite low end brushes that I use in my professional makeup kit. You don't NEED a hundred dollar brushes to achieve a flawless makeup application. We live in a era where you can find a dupe for almost every high end brush on the market !


Real Technique

This brand is one of my top favorites ! They have the best sturdy, affordable makeup tools. They offer brushes for complexion and eyes.

My favorite tools are:
Powder Brush
Retails for 9.99

Even though its for your face, its big enough
to also be used for the body. 

Complexion Sponge
Retails for 4.99

This tool is perfect for                                    
applying foundation, 
concealer, cream 
contour/bronzer, applying                         
powder.                                                  


Blush Brush
Retails for 8.99

This tool is perfect adding blush and
also other powder products. 


Foundation Brush
Retails for 7.99

The tool is perfect for sculpting the face.


 Coastal Scents


PRO Blending Fluff Brush
$4.95

Perfect dupe for the MAC 217 Brush


Classic Concealer Brush
$3.95

Great for cleaning up under the brows !


E.L.F


Highlighting Brush
$6.00

Eyebrow Brush DUO
$3.00


Complexion Brush
$6.00

Eye shadow/Blending Brush
$6.00

Perfect for packing on eye shadow 


Wednesday, January 4, 2017

TRENDING....Brows, Lashes & GLOW !


This is a trend that I wouldn't mind seeing again in 2017. I call this the "Pretty" Makeup Trend. Even though its a FULL face of makeup, its very fresh and enhances the face beautifully.

The picture to the right is a perfect example of this look. She has beautiful luminous skin, full sculpted brows and long, wispy lashes. She has minimal eye shadow and a winged liner.There are different ways you can achieve this look.

Based on preference, you can minimize and enhance as much as you would like. Some may like shorter lashes or more eye shadow. Go with whatever makes you feel beautiful and enhances your features.


Here are some of my HOLY GRAIL products for this look:

MAC Strobe Cream
This will bring out the GLOW within..
You can either mix with your moisturizer or add on top
Embryolisse Lait-Creme
This is a primer, moisturizer, remover, etc


Loreal Voluminous Mascara
Best Mascara for adding volume and giving
 a "false lash" look to the lashes


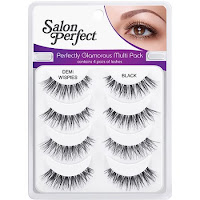
Salon Perfect
DEMI Wispies 


LORAC Unzipped Palette 


Wednesday, December 21, 2016

How To: 15 Minute Face


Everyday beauty doesn't have to take hours and hours. These steps will have you looking fresh and beautiful for your long day ahead.

1. MOISTURIZE/PRIME

Skincare is very important. Starting off with a good moisturizer and eye cream will prep your makeup for a smooth and flawless application.
The eye cream should be applied along the bone of your eye socket, and both below the eye and above it.

Tip: After your moisturizer/eye cream, use a thin tissue to blot some of the product. You want your skin to be supple, but not slippery.

Primer should be applied everywhere makeup will be applied. Don't forget the neck !


2. CONCEAL

Applying concealer underneath your eyes will not only camouflage darkness, it will brighten and lift. This method will give a more bright and awake look, which is perfect for Day Time.

Don't neglect your other areas. Apply concealer to blemishes and other trouble areas you may have.

Tip: Dabbing the product into the skin will give you better coverage. Wiping/Smearing will sheer it out.


3. FOUNDATION

 Start from the middle of your face, blending out to create a flawless
 but natural finish. The middle of our face usually needs the most coverage.
 I recommend using a damp beauty sponge or buffing brush.

Tip: Using our hands to apply foundation is quicker and melts the product into
the skin BUT it adds more time to your application. Gotta wash those hands !

Don't forget to SET ! Using a translucent powder on top of your liquid or cream will
extend wear and keep everything in place.


4. ADD COLOR

It doesn't end here ladies and gents. We must bring color and dimension back into the face.

Start with a Bronzer. Sweep the powder around the temples, jawline and even cheekbones
for a contour. This will add dimension but it will bring a natural glow to the face.

Adding a light layer of blush will add color. Tap off the remaining product on the brush, and sweep
across the apples of the cheeks for a natural flush.


5. DEFINE THE EYES

Start off with your favorite mascara. Go with something that adds volume and gives you that false lash effect.

Add a liner, preferably black or dark brown. This should be applied on the lash line and along your waterline.

Tip: For a natural, smokey look, smudge the liner out using a liner brush and eye shadow.

Remember that bronzer we used ? Use that as a shadow !
Sweep it across your lids using a fluffy blending brush.


6. LIPS

For a day time look, you may want to go for a nude or pink tone.
When doing lips, I do lip liner, lipstick/liquid lip, gloss for extended stay and shine,
Trust me, lip liner is your best friend !
Using a lip liner of your choice, line your lips and fill them in completely.
Next apply your lip color evenly. Use to thin tissue to blot if needed.
Lastly, add your gloss for high shine.

Tip: Applying gloss in the middle of the lips will give the lips a plumper appearance.


Tuesday, December 6, 2016

Basics of Highlighting & Contouring


Highlighting/Contour Technique using cream products.
Highlighting & Contouring is the most popular trend today. Even though people have been doing this for years, everyone is very intrigued with the method, and want to incorporate it in their everyday routine.

The questions I always get are " Are you going to slim my face/nose down ?", or "Are you going to brighten my face ?". Yes this method does those things but if you didn't know, we ALL already have a natural highlight and contour. Less talk about it....


Instagram
@ira.anthonymua

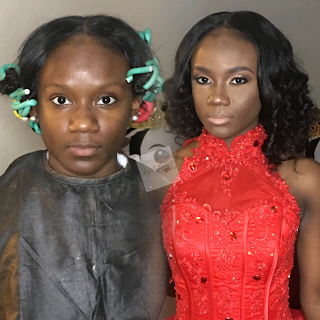
The photo to the left is a before/after shot of my client for her sweet sixteen. If you study her face, you can see that her skin is lighter in the center of her face & darker on the outside. This method is used to ENHANCE the features you already have. Its also used to manipulate features that you would like to be distinct and also camouflage.

Contouring is a method used to push features back. Meaning, if you have a feature that you would like to be less prominent you would contour. With my client I contoured the hairline, hollows of her cheeks, jaw line & nose. Depending on your features, some may not need to contour all of those I've listed.

When contouring, you must use a shade that is TWO shades darker than your skin tone. I would normally use either a cream or liquid foundation to contour, and use a powder to set the contour in place.


Now lets discuss HIGHLIGHTING......
Instagram
@ira.anthonymua


This is a method to be used when you want a feature to be more pronounce and bright. The middle of the face; forehead, brow bone, down the nose, under eyes (brighten/lift), cupids bow and chin are areas you highlight. It can also be used under the hollows of your cheeks to clean/sharpen your contour.

This can used with a cream, liquid and/or powder. The shade used must be TWO shades lighter than for skin tone.

In the picture,  I've used this method under the eyes for brightness and lift.


Saturday, December 3, 2016

Setting Powders & Flashback


 I'm sure we have ALL experienced the horror of flashback.
Whether it was a ashy, white powder we used to bake under our eyes or the foundation/powder had too much SPF. SPF is built to reflect light. If you're going to be taking a lot of selfies or walking the red carpet, anything with high SPF is a big no no.

Skin Tone is also an important factor when purchasing a setting powder. We all know the term "TRANSLUCENT". Translucent is basically No Color....or lets say what its SUPPOSED to be. There are many powders that say its translucent, but when you apply its gives a white cast under the eyes.


Below are my TOP 3 Favorite Setting Powders


$20.00


This setting powder is amazing for Medium to Super Deep Skin tones. Sacha Buttercup Powder is a flash friendly setting powder that will set your foundation/concealer and enhance your highlighted areas.


$38.00


This powder definitely gives your skin a silky, luxurious feel. It will leave you with a Modern Matte Finish. This powder will be great with any skin tone.


$12.00


The RCMA "No Color" setting powder is one of my holy grail products.
This product will smooth and set your face to perfection.


.