Wednesday, December 21, 2016

How To: 15 Minute Face


Everyday beauty doesn't have to take hours and hours. These steps will have you looking fresh and beautiful for your long day ahead.

1. MOISTURIZE/PRIME

Skincare is very important. Starting off with a good moisturizer and eye cream will prep your makeup for a smooth and flawless application.
The eye cream should be applied along the bone of your eye socket, and both below the eye and above it.

Tip: After your moisturizer/eye cream, use a thin tissue to blot some of the product. You want your skin to be supple, but not slippery.

Primer should be applied everywhere makeup will be applied. Don't forget the neck !


2. CONCEAL

Applying concealer underneath your eyes will not only camouflage darkness, it will brighten and lift. This method will give a more bright and awake look, which is perfect for Day Time.

Don't neglect your other areas. Apply concealer to blemishes and other trouble areas you may have.

Tip: Dabbing the product into the skin will give you better coverage. Wiping/Smearing will sheer it out.


3. FOUNDATION

 Start from the middle of your face, blending out to create a flawless
 but natural finish. The middle of our face usually needs the most coverage.
 I recommend using a damp beauty sponge or buffing brush.

Tip: Using our hands to apply foundation is quicker and melts the product into
the skin BUT it adds more time to your application. Gotta wash those hands !

Don't forget to SET ! Using a translucent powder on top of your liquid or cream will
extend wear and keep everything in place.


4. ADD COLOR

It doesn't end here ladies and gents. We must bring color and dimension back into the face.

Start with a Bronzer. Sweep the powder around the temples, jawline and even cheekbones
for a contour. This will add dimension but it will bring a natural glow to the face.

Adding a light layer of blush will add color. Tap off the remaining product on the brush, and sweep
across the apples of the cheeks for a natural flush.


5. DEFINE THE EYES

Start off with your favorite mascara. Go with something that adds volume and gives you that false lash effect.

Add a liner, preferably black or dark brown. This should be applied on the lash line and along your waterline.

Tip: For a natural, smokey look, smudge the liner out using a liner brush and eye shadow.

Remember that bronzer we used ? Use that as a shadow !
Sweep it across your lids using a fluffy blending brush.


6. LIPS

For a day time look, you may want to go for a nude or pink tone.
When doing lips, I do lip liner, lipstick/liquid lip, gloss for extended stay and shine,
Trust me, lip liner is your best friend !
Using a lip liner of your choice, line your lips and fill them in completely.
Next apply your lip color evenly. Use to thin tissue to blot if needed.
Lastly, add your gloss for high shine.

Tip: Applying gloss in the middle of the lips will give the lips a plumper appearance.


Tuesday, December 6, 2016

Basics of Highlighting & Contouring


Highlighting/Contour Technique using cream products.
Highlighting & Contouring is the most popular trend today. Even though people have been doing this for years, everyone is very intrigued with the method, and want to incorporate it in their everyday routine.

The questions I always get are " Are you going to slim my face/nose down ?", or "Are you going to brighten my face ?". Yes this method does those things but if you didn't know, we ALL already have a natural highlight and contour. Less talk about it....


Instagram
@ira.anthonymua

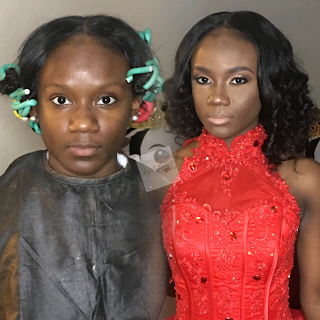
The photo to the left is a before/after shot of my client for her sweet sixteen. If you study her face, you can see that her skin is lighter in the center of her face & darker on the outside. This method is used to ENHANCE the features you already have. Its also used to manipulate features that you would like to be distinct and also camouflage.

Contouring is a method used to push features back. Meaning, if you have a feature that you would like to be less prominent you would contour. With my client I contoured the hairline, hollows of her cheeks, jaw line & nose. Depending on your features, some may not need to contour all of those I've listed.

When contouring, you must use a shade that is TWO shades darker than your skin tone. I would normally use either a cream or liquid foundation to contour, and use a powder to set the contour in place.


Now lets discuss HIGHLIGHTING......
Instagram
@ira.anthonymua


This is a method to be used when you want a feature to be more pronounce and bright. The middle of the face; forehead, brow bone, down the nose, under eyes (brighten/lift), cupids bow and chin are areas you highlight. It can also be used under the hollows of your cheeks to clean/sharpen your contour.

This can used with a cream, liquid and/or powder. The shade used must be TWO shades lighter than for skin tone.

In the picture,  I've used this method under the eyes for brightness and lift.


Saturday, December 3, 2016

Setting Powders & Flashback


 I'm sure we have ALL experienced the horror of flashback.
Whether it was a ashy, white powder we used to bake under our eyes or the foundation/powder had too much SPF. SPF is built to reflect light. If you're going to be taking a lot of selfies or walking the red carpet, anything with high SPF is a big no no.

Skin Tone is also an important factor when purchasing a setting powder. We all know the term "TRANSLUCENT". Translucent is basically No Color....or lets say what its SUPPOSED to be. There are many powders that say its translucent, but when you apply its gives a white cast under the eyes.


Below are my TOP 3 Favorite Setting Powders


$20.00


This setting powder is amazing for Medium to Super Deep Skin tones. Sacha Buttercup Powder is a flash friendly setting powder that will set your foundation/concealer and enhance your highlighted areas.


$38.00


This powder definitely gives your skin a silky, luxurious feel. It will leave you with a Modern Matte Finish. This powder will be great with any skin tone.


$12.00


The RCMA "No Color" setting powder is one of my holy grail products.
This product will smooth and set your face to perfection.


.


Friday, December 2, 2016

Finding Your Perfect Match....


     Hello Guys ! I feel like discussing another part of complexion/skin and that is FOUNDATION. Usually with clients I ask questions like, What brand do you normally use? Do you use Cream, Liquid or Powder ? 
Do you set it with a Powder ? All of these questions are important to me because I want to know the type of woman I am working with. In the last article, I spoke about skin type, and the products you would need to help keep your makeup flawless all day. I am going to break down the different foundations for each skin type & also give you low end and high end options. 


Foundation comes in 3 methods; Liquid, Cream & Powder. When choosing your foundation, you want to base it off of your skin type, amount of time you have for application, and how long of a wear you will need. Are you the everyday woman ? The woman that works very long hours, or Are you the stay at home/soccer mom ? The woman that needs light coverage to just to run errands. All of these aspects are important.

Liquid Foundation

Based on my experience, liquid foundation is the most common form of foundation used. Its light weight and it is very easy to blend. Either drug store or department store, you will always find a liquid foundation that is suitable for your skin type. Well....if its in stock lol, I'm sure were all victims of that.

Listed below are different foundations in liquid form that you will see in a store.

- The "Dewy" Foundation (Combination/Dry Skin)
- The "Matte/Pore-less" Foundation (Oily Skin)
- The "Skin Clearing/Soothing" (Sensitive/Dry Skin)
Maybelline BETTER SKIN Foundation (Medium-Full Coverage)
$11.99

Maybelline FIT Me Foundation (Medium-Full Coverage)
$6.99
Urban Decay ll Nighter Foundation (Full Coverage)
$40.00

Cream Foundation

This type of foundation has a thick consistency and is usually packaged in stick form or jar.
Cream is by far my favorite type of foundation, especially for brides. It has amazing coverage & blends beautifully.
ABH Stick Foundation
$25.00

Black Opal Stick Foundation
$9.99

MUFE HD Foundation
$42.00


Powder

Powder is another common foundation. It is used for Setting (foundation/concealer), Adding coverage to your foundation or used on its own. Powder can also be used as a brighter and contour.

There are different forms of powder.

PRESSED
Comes in a compact, easy to travel with.
Has a matte, full coverage finish. Suitable for Normal/Oily skin types.

LOOSE
Usually finely milled and comes with a sifter. Their coverage can range from sheer to medium. Suitable for all skin types.


MAC Studio Fix Powder
$28.00
Maybelline BETTER Skin
$8.99

Tarte Amazonian Clay Airbrush Foundation
$36.00


Wednesday, November 30, 2016

Exploring Skin Types & The "Barrier"


  Being a Freelance Makeup Artist, over the years I have listened to many of my clients say that they didn't have a regular skincare regimen. Skincare is a MAJOR essential when wanting beautiful, plump and flawless skin. Based on your skin type; you can have a daily skincare routine that will not only prepare, and protect your skin for makeup, but to also leave you with beautiful skin without. In this article, I will break down the different skin types & talk about the benefits of skincare when applying makeup.

These tips will keep it looking its best:
  1. Use a broad spectrum sunscreen that blocks both UVA and UVB rays.
  2. Don't smoke.
  3. Drink plenty of water. Hydration keeps the skin quenched & plump.
  4. NEVER wear your makeup to bed
  5. Moisturize.

SKIN TYPES


NORMAL
Those with this skin type have a well balanced amount of moisture.
Care for Normal Skin types is protection from the sun

- Even Tone
- Small Pores
- Radiant Complexion

COMBINATIONThose with this skin type are usually dry and oily in different areas. In my experience, usually the Oily areas are in the TZONE (Forehead. Nose, Chin and Cheeks. 

- Larger Pores
- Dry Spots
- Blackheads

DRY
You may experience rough and flaky skin. Sometimes even itchy, irritated or inflamed.

- Rough/Dull Complexion
- Red Patches
- Very Small Pores/Almost Non Existent
- Visible Lines

OILY
This skin type is a very common for most.
Oiliness can change depending on climate, hormones, stress and diet.
You may have:

- Enlarged Pores
- Dull/Shiny Complexion
- Blackheads, Dark Spots
- Blemishes

SENSITIVE
Those with sensitive skin can experience burning, itching and dryness. You must be very careful with the products you use. Hypoallergenic products are preferred.


                           Now, Lets talk about "The BARRIER"

What's the Barrier ? Its the layer between your skin and your makeup. The barrier is very important because it not only extends the wear of your makeup, it keeps your makeup looking flawless and smooth all day.
This layer consists of the skincare you applied, topped off with PRIMER.


What is a PRIMER ??

This is a question I'm asked on a regular basis, and people wonder why its important. Primer is very important because it works as a base to smooth your makeup and extends the wear.

Primers come in 3 formula's : Cream, Gel & Powder

Primers are also available in different skin type formula's.

- Mattifying (Mainly for those with Oily/Combination Skin)

Beauty Hack: Milk Of Magnesia works perfect as a Mattifying Primer :)


- Hydrating (For those who have Dry Skin)

Tip: Embryolisse Lait Creme works as a Moisturizer, Primer & Makeup Remover


-Soothing/Illuminating (For those with Dry, Sensitive, Dull Skin)